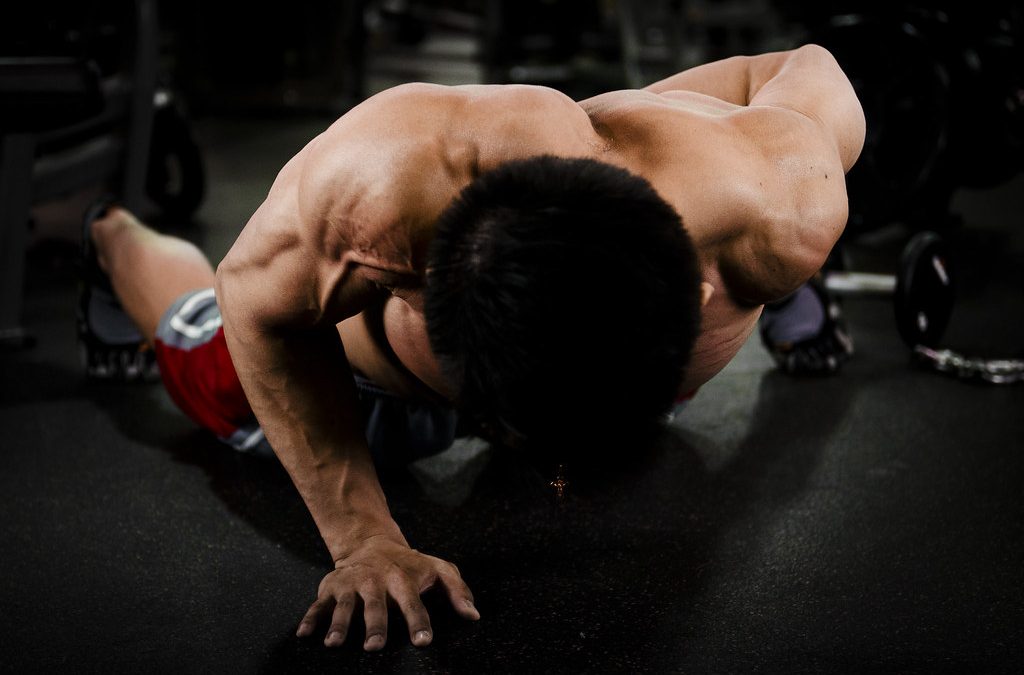
Push-ups are one of the most effective, versatile, and now, most frequently challenged exercises. Push-up challenges can be seen all over the internet, ranging from James Harrison doing push-ups with his kids on his back to police spreading awareness to mental health.
For a variety of reasons, push-ups are a staple in most strength and conditioning programs. Even Arnold Schwarzenegger included them in his home workout routine back in his competitive bodybuilding days.
Push-ups – and push-up challenges – are certainly here to stay. But what makes such a simple exercise so popular?
Push-ups have a myriad of benefits, including the following:
✅ Improved Upper Body Muscular Development
✅ Stronger Trunk Muscles
✅ Improved Shoulder Stability
✅ Improved “Functional” Fitness
✅ Versatile; Lots of Regressions and Progressions to Scale to Your Fitness Level
✅ Accessible; No Equipment Needed, So You Can Get or Stay Fit Anywhere
If these benefits still don’t entice you to drop on the floor and give me twenty, consider this: Research indicates push-ups can even help you live longer.
Well, sort of.
Research suggests there is a relationship between how many push-ups you can do and your risk of cardiovascular disease risk, the leading cause of death worldwide (1). Even at the least, the study concluded that push-ups could serve as a functional assessment tool to help gauge overall health.
Push-ups sound pretty important, huh?
Unfortunately, push-ups commonly get butchered. As a result, many people may experience shoulder, neck, and back pain from doing too many push-ups incorrectly. Here’s how you can look like you know what you are doing and reap all of the benefits without the pain.
✋ Five Common Mistakes
Here are five common mistakes to avoid when performing a push-up:
- Excessive Forward Head Posture (“The Chicken Head”)
- Flaring Your Elbows (“The Mr. ‘T’-Push-up”)
- Arching Your Back / Sagging Your Hips (“The Eager Lover”)
- Hips Too High (“The Hippy”)
- Performing Half-Reps (“The Half-Repper”)
These occur either because of lack of awareness or compensation (your body finding an easier way to perform them). These also apply to push-up variations, such as knee push-ups and elevated push-ups, which we will discuss later. By addressing these movement faults, you will be able to take advantage of the benefits push-ups have to offer while keeping your shoulders and spine healthier in the long-term.
Here are the five common mistakes in more detail and how to fix them.
❌ Mistake #1: Excessive Forward Head (“The Chicken Head”)
“The Chicken Head”, like many compensations, is used to inadvertently “cheat” by thinking you are getting lower than you actually are. However, this can also be a compensation due to faulty posture.
Many people spend the majority of their days behind a desk and computer with suboptimal posture. Over time, this can cause your body to adapt to this position, resulting in a rounded-shoulder, forward head posture. Aside from detracting from the benefits of optimal posture, this can also lead to pain and dysfunction, particularly in the cervical, or neck region.
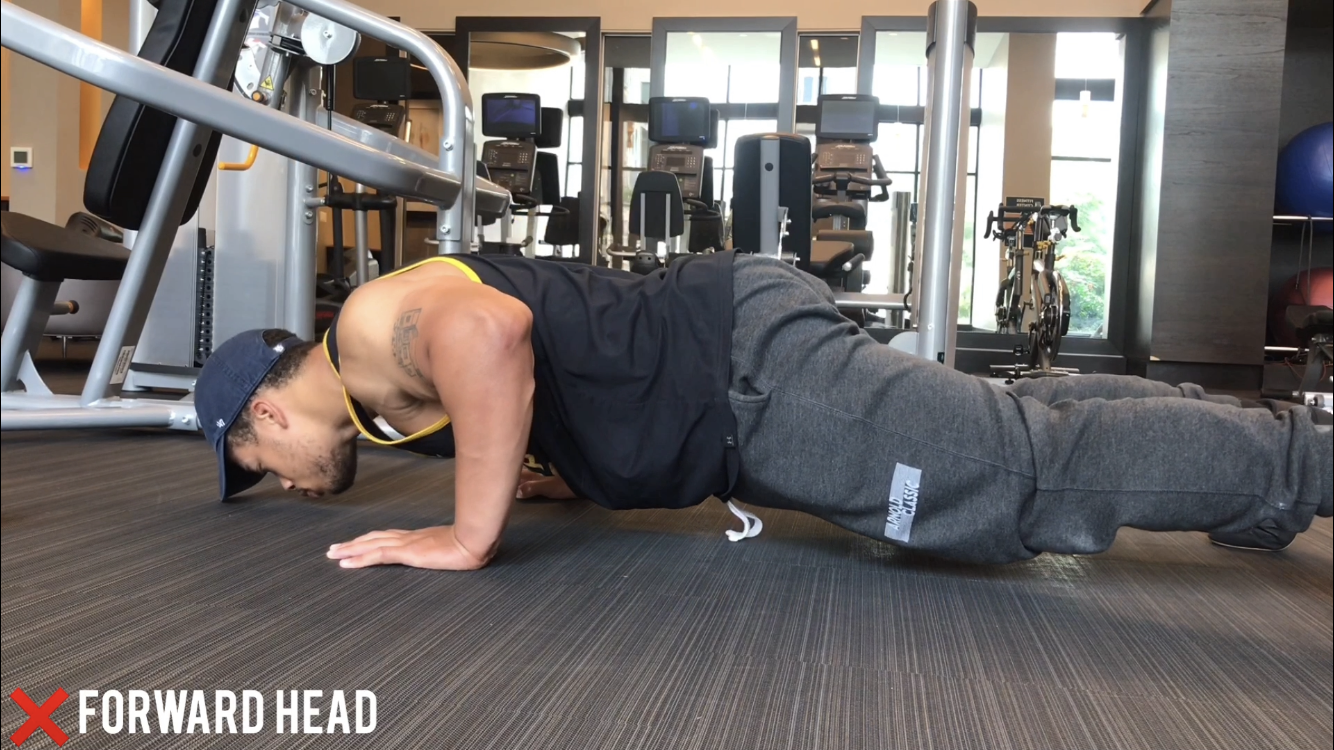
You can make one small adjustment that will help not only your push-ups, but your overall posture and shoulder health.
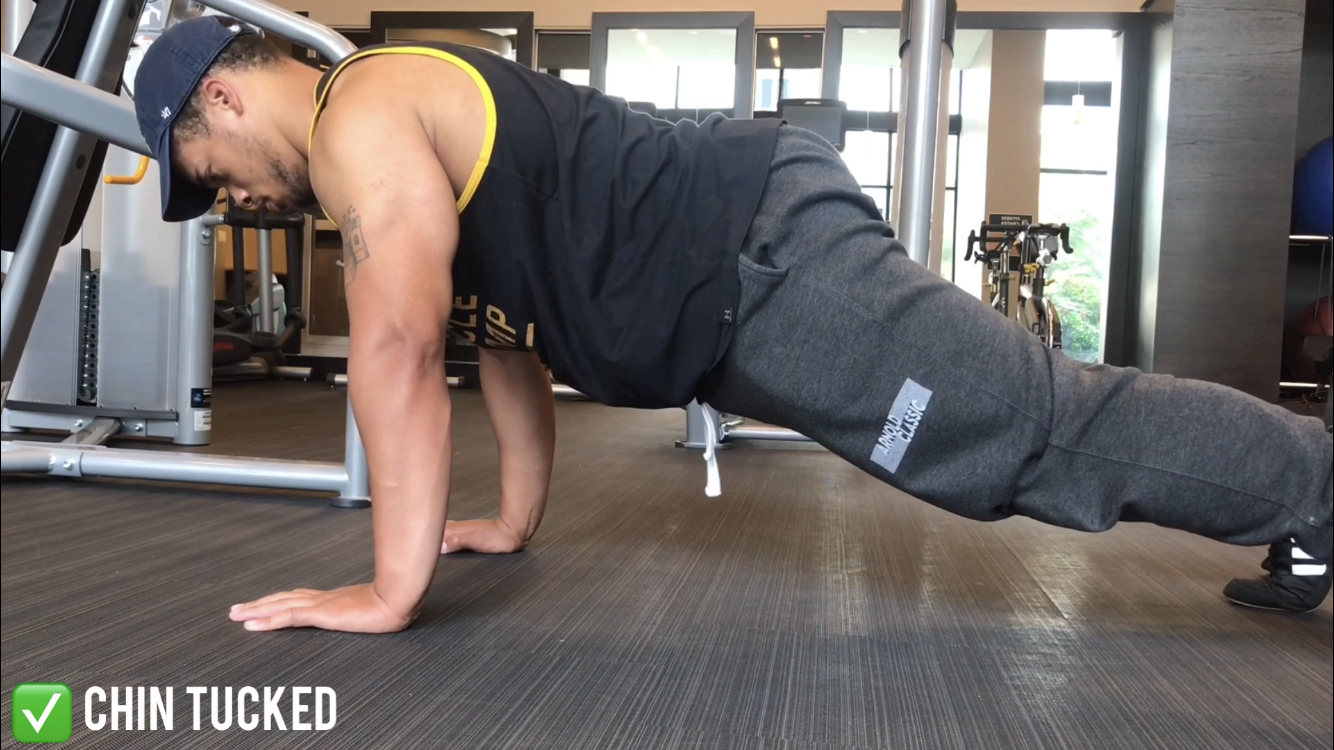
✅ Fix: Tuck Your Chin
Align your ears with your shoulders by pushing your chin into your neck as if making a double-chin. Your should feel as if your entire head is sliding back on your neck.
If you still experience problems and/or want to improve your posture, try the following corrective sequence of soft-tissue work, stretching, and activation drills.
Inhibit and Lengthen
Use finger pressure or a tool (such as a Thera Cane), to massage the muscles around your neck and shoulders. Search for any tender areas and apply pressure to these regions for 30-60 seconds each.
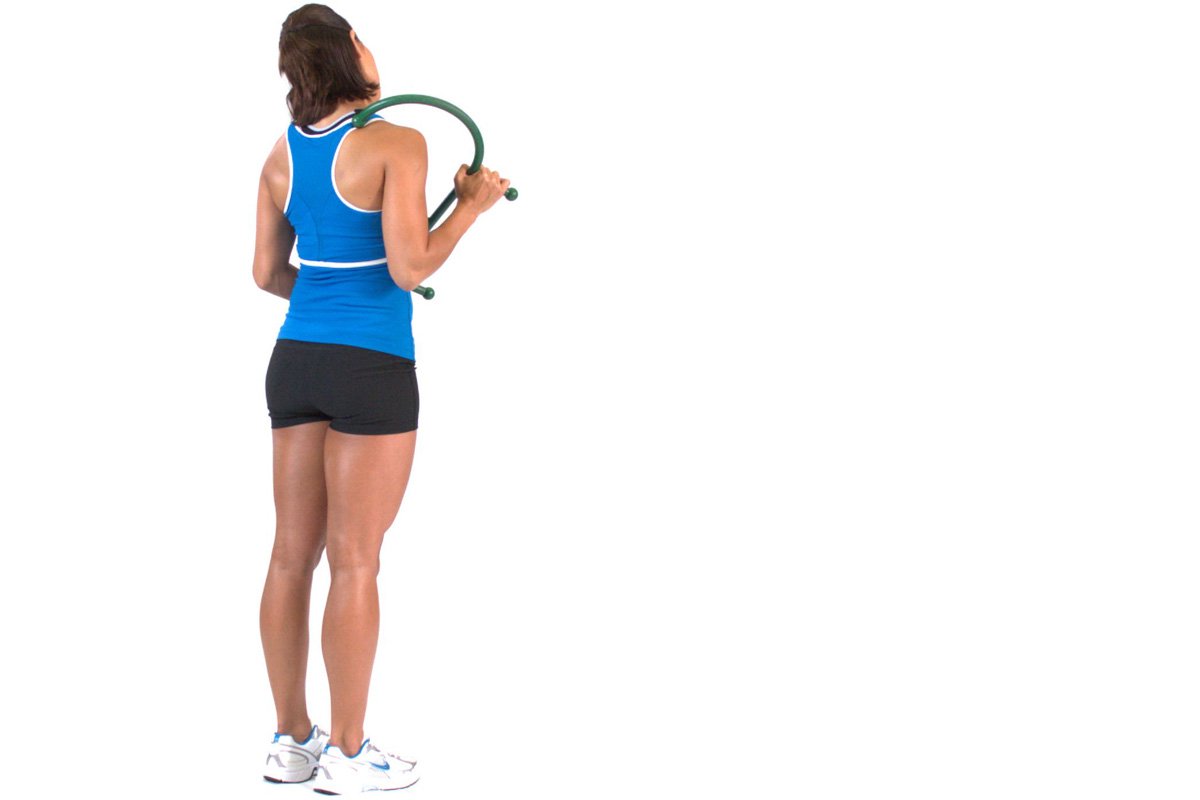
Afterwards, stretch the associated areas, such as your upper traps, using these three stretch positions for 30-60 seconds.
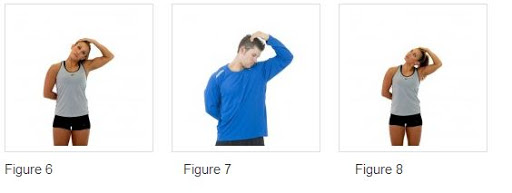
Figure 6: Ear to Shoulder (Upper Traps); Figure 7: Looking Into Pocket (Levator Scapulae); Figure 8: Tilted Head, Looking Toward Ceiling (Sternocleidomastoid, or SCM)
These techniques will provide some “space” to work on your neck by lessening the chance of these muscles intervening while performing the activation exercise.
Activate
Perform a Quadruped Chin Tuck as an activation drill last to correct your posture. Start on all-fours with both of your knees bent on the floor underneath your hips and both of your hands underneath of your shoulders. Practice retracting your head by sliding your chin into your neck and holding for a few seconds. Perform 10 reps.
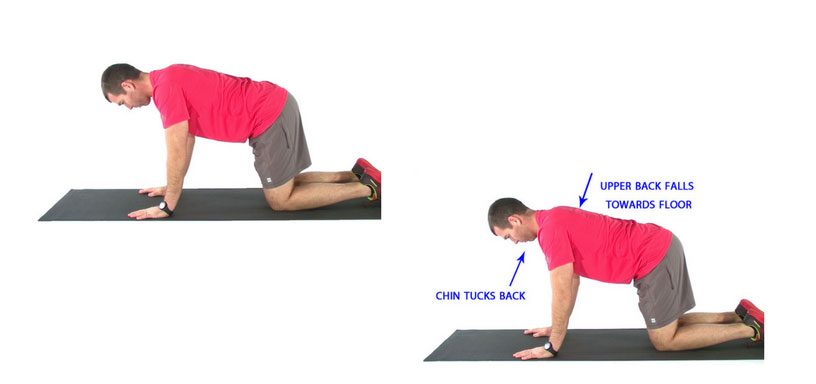
Performing the movement in a quadruped position will give you a less stressful position to practice tucking your chin, strengthening underactive muscles and improving your posture. This will also help relieve tension from your shoulders and reduce discomfort and the incidence of injury in these areas.
After performing this drill, integrate this new change into your push-ups.
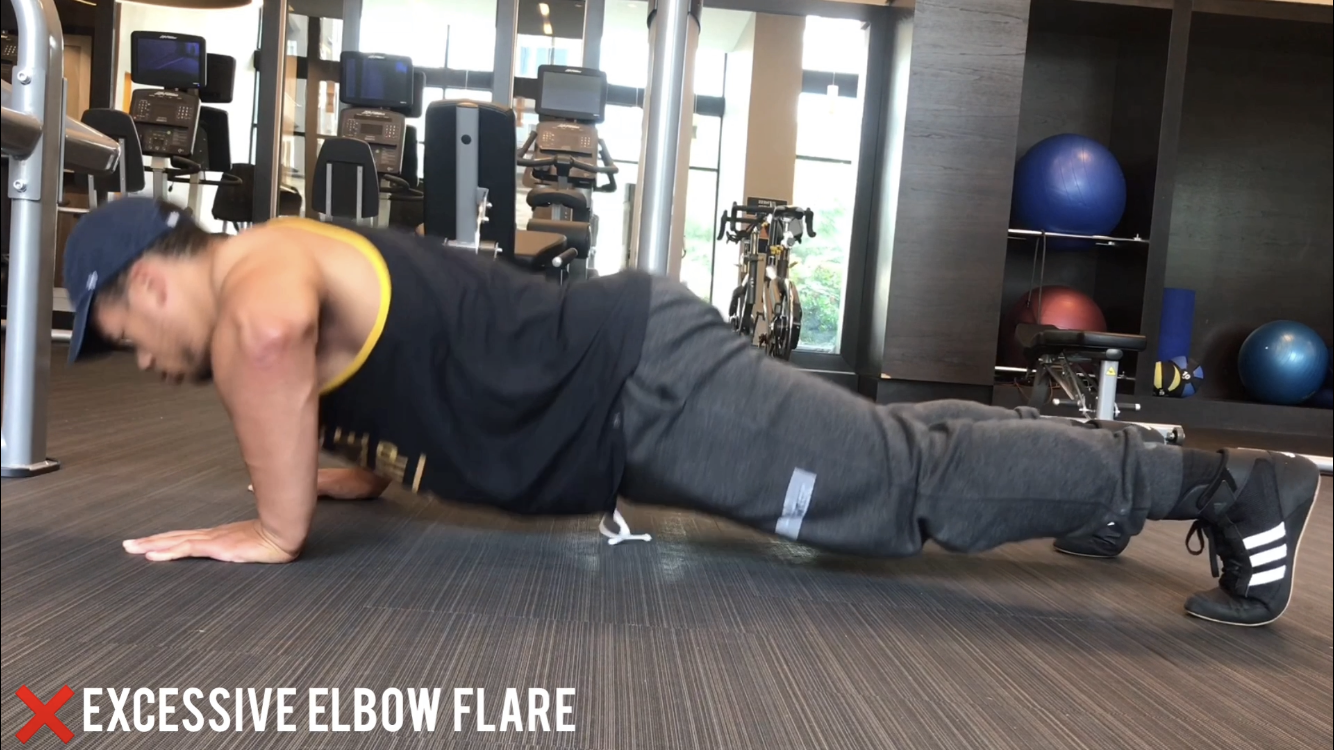
❌ Mistake #2: Excessively Flaring Your Elbows (The “T-Push-Up”)
Excessively flaring your elbows out can place additional stress on the shoulder region, specifically the rotator cuff surrounding the shoulder joint.
T-Push-ups are often coupled with wider your hand position; the wider your grip, the more likely your elbows are to flare. This is why wider hand placement on push-ups (and other pressing movements, such as the bench press) can cause discomfort for individuals with preexisting shoulder problems. If you purposefully decide to do a wide-grip push-up, I suggest to consider this a slight variation from the normal push-up. However, it is worthy to note there is research supporting that a more narrow base elicits greater muscle activation (2). Coincidentally, most people will describe this alternative as being more challenging.
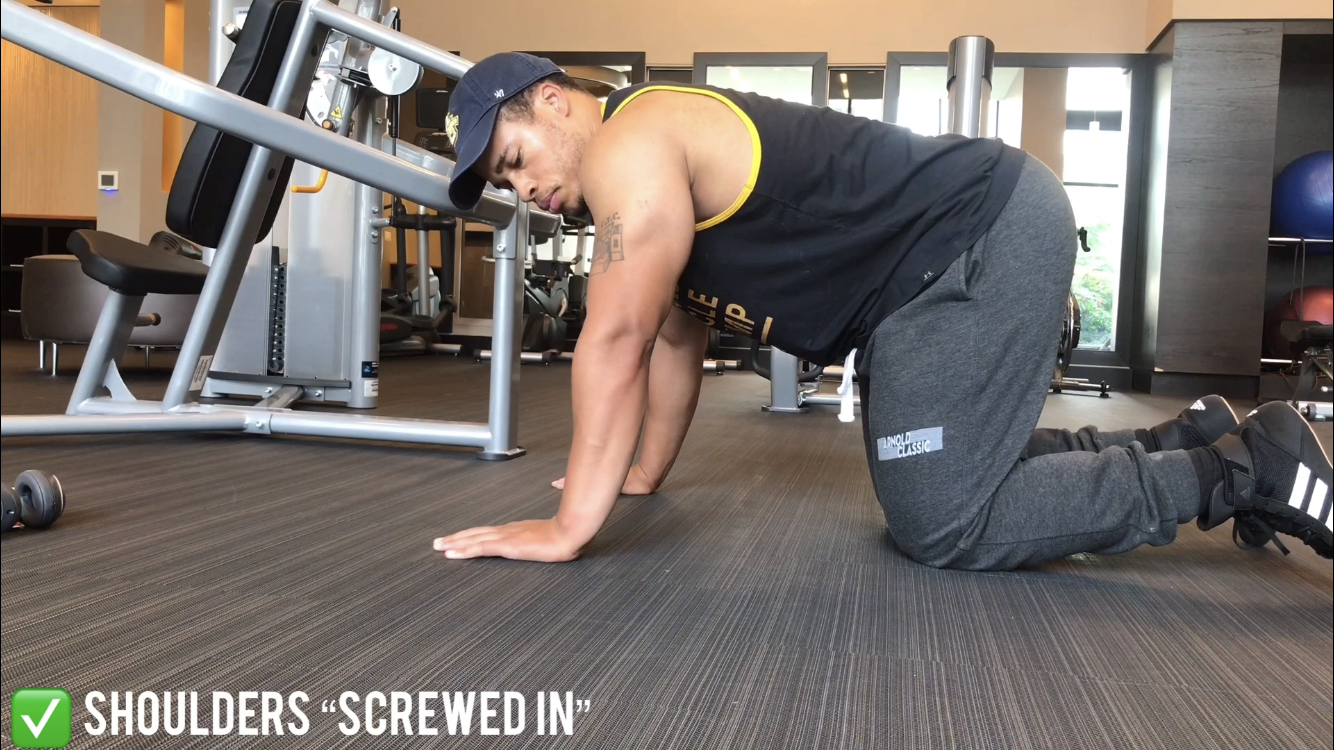
✅ Fix: “Screw In” Your Shoulders
Tucking your elbows to a 45-degree angle to form an arrow with your body is a common push-up form recommendation. This could help spare you pain and discomfort in your shoulders in the long-term.
One way to ensure of this and help optimize your shoulder mechanics is to “screw in” your shoulders. To screw in your shoulders, assume the push-up position and actively twist your palms outward into the ground, allowing your shoulders to rotate slightly. While your hands will not actually move, you should feel the tension in your shoulders. Your elbows will naturally rotate inward slightly if you are doing this correctly. If you maintain this throughout the majority of the movement, your elbows will remain more evenly tucked.
Another way of practicing tucking in your elbows is by performing a different push-up variation. Try using a neutral grip with your palms facing each other. You can use a pair of dumbbells or push-up bars to get into this position. This is also a quick-fix alternative for if you have discomfort in your wrists while performing push-ups.
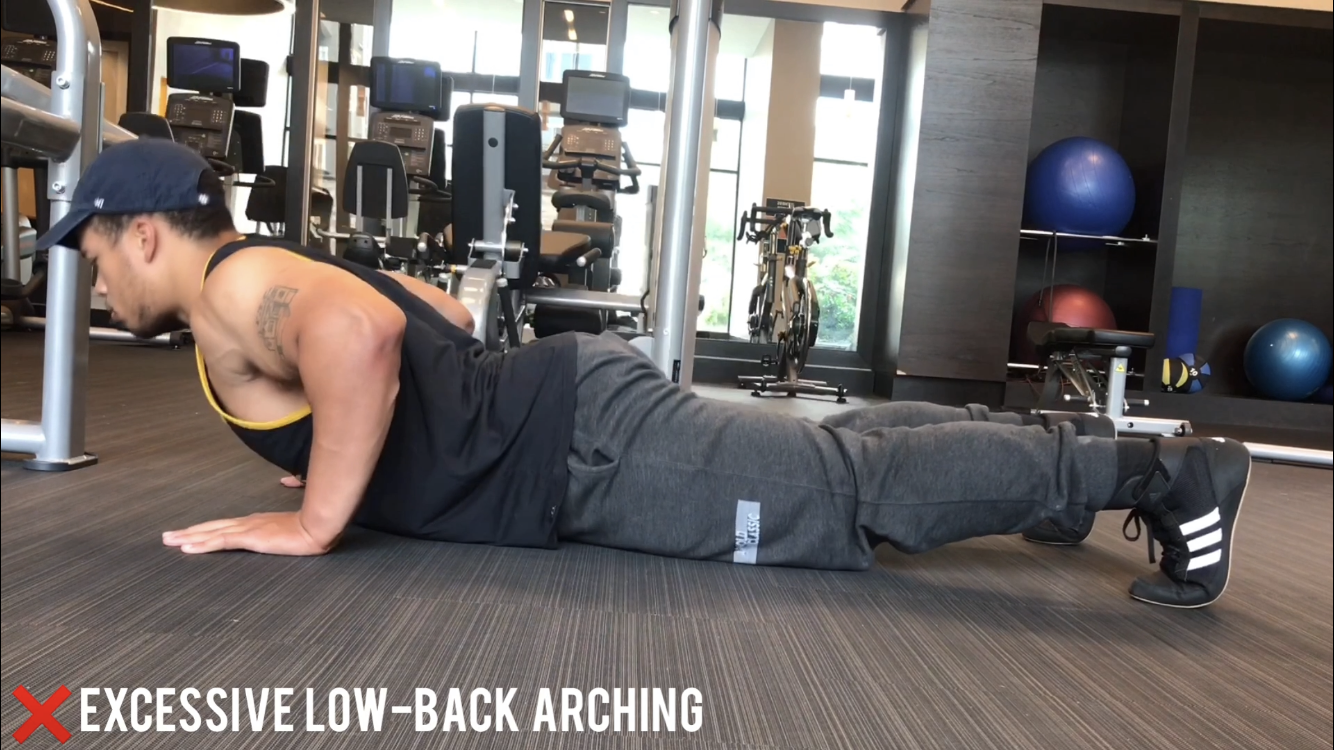
❌ Mistake #3: Excessive Arching (“The Eager Lover”)
“The Eager Lover” is another common deviation in which the back arches excessively, often in conjunction with sagging hips. This mistake is perhaps one of the most common reasons for push-ups causing discomfort in the lower-back. But not only can this decrease your abdominal engagement and increase stress in your lower back…it just looks wrong.
Similar to the forward head posture, this compensation might occur due to posture. If your pelvis is normally tilted forward excessively, this compensation is more likely to occur to some extent. While this forward-tilted posture (referred to as an anterior pelvic tilt) can be the cause of lower-back pain, push-ups, especially when fatigued, can exaggerate this discomfort.
✅ Fix: Brace Your Core
Learning how to properly brace and engage your glutes can help prevent this and prevent push-ups from being a pain in your back.
To brace your core, tighten your abs as if preparing to take a punch in the stomach. Practice this working on 360 degrees of bracing – tightening your obliques and low-back also. Bracing has a spectrum of different intensities, but for push-ups, you should still be able to maintain normal breathing unless your are nearing muscular failure.
To further enhance the effect of bracing, particularly if your pelvis tilts forward as described earlier, squeeze your glutes. This can help position your pelvis into a more neutral position while bracing your core. This might take some practice, but it helps to pretend as if you have a $1000 bill in between them! However, just like bracing, you do not need to maximally squeeze your glutes throughout the set – just keep them engaged.
A common strategy to prevent your hips from sagging is to raise your hips in the bottom position to compensate. This can be a hit or miss tactic because you also want to avoid going to the opposite extreme. A better idea to “remind” you of hip alignment is to place a band underneath your hips. This will give you feedback to help maintain alignment and serve as assistance on the concentric portion when you extend your arms.

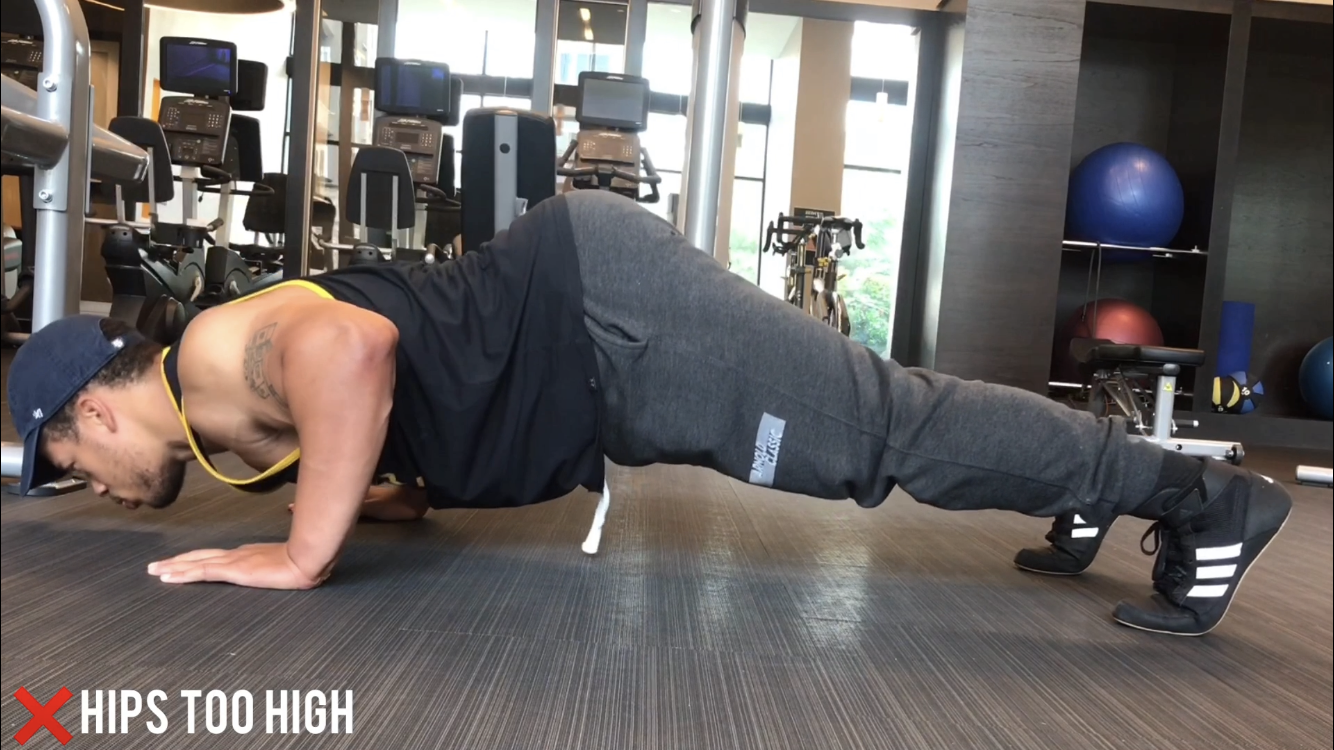
❌ Mistake #4: Having Your Hips Too High (“The Hippy”)
“The Hippy” is another inadvertent tactic that reduces core engagement to make the exercise easier. Aside from missing out on full core engagement, it can also be more stressful on your shoulders. Unless you are performing a Pike Push-up (a push-up variation aimed at purposefully targeting your shoulders more), try to keep your hips in an even line with the rest of your body.
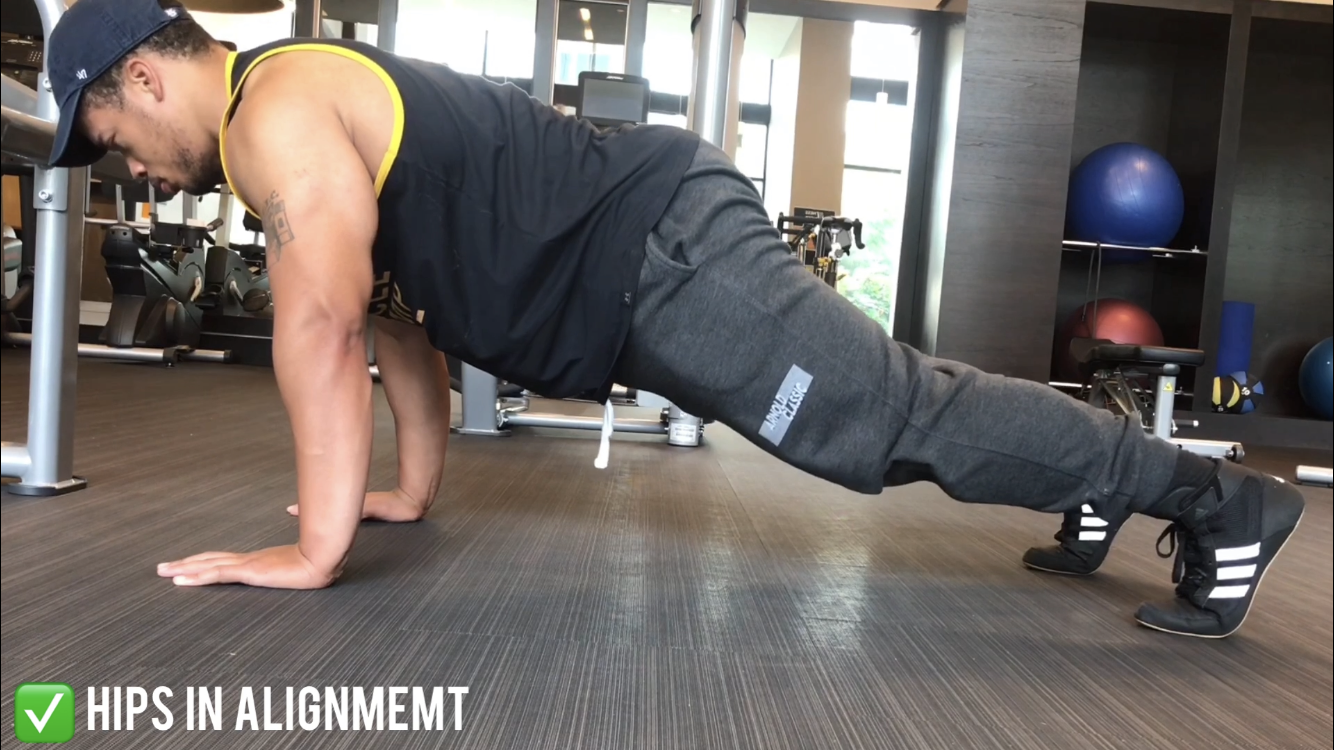
✅ Fix: Align Your Hips
Position your hips in a straight line between your ankles, knees, shoulders, and ears. Optimal alignment will also help you with bracing.
Imagine you have a glass of water on your back and you are trying to prevent it from tipping over.
❌ Mistake #5: Partial Reps (“The Half-Repper”)
Partial repetitions are either not getting low enough or not getting high enough. This often occurs when trying to speed through as many push-ups as possible.
As research indicates, full range-of-motion is optimal for muscle and strength development (3).
If you have no injury or pain, lower until you are at least breaking 90-degrees before straightening your arms.
✅ Use a Marker
To ensure you are getting low enough, touch your chest to a point that gets your arms at or under 90-degrees.
If you are having difficulties with getting full range-of-motion, keep reading for some modifications you can use to make this easier to implement.
To review, to perform a push-up and avoid the common mistakes, focus on implementing the following:
✅ Tuck Your Chin
✅ Screw In Your Shoulders
✅ Brace Your Core
✅ Align Your Hips
✅ Use a Marker
Because the compensations listed earlier are meant to make the exercise easier, performing push-ups might temporarily be more challenging then before. These “fixes” will take time, but stick to them and you will get more out of your push-ups with less pain and discomfort. In the meantime, if you are having some trouble, it might be a smart idea to make the exercise easier while instilling these new changes.
Here are some other variations you can use to start working on your push-ups immediately, regardless of your fitness level.
⏩ Progressions
If you want to refine your push-up technique or simply build up to a traditional push-up, start with these variations.
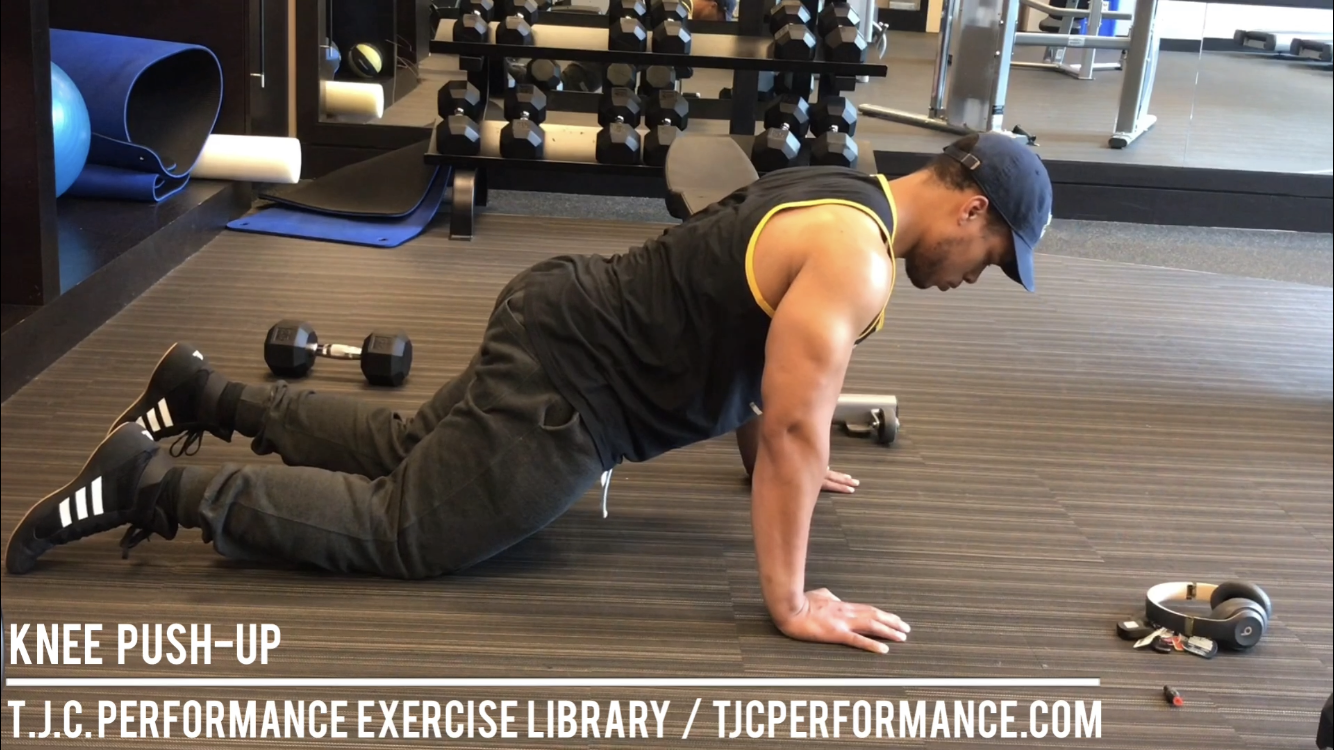
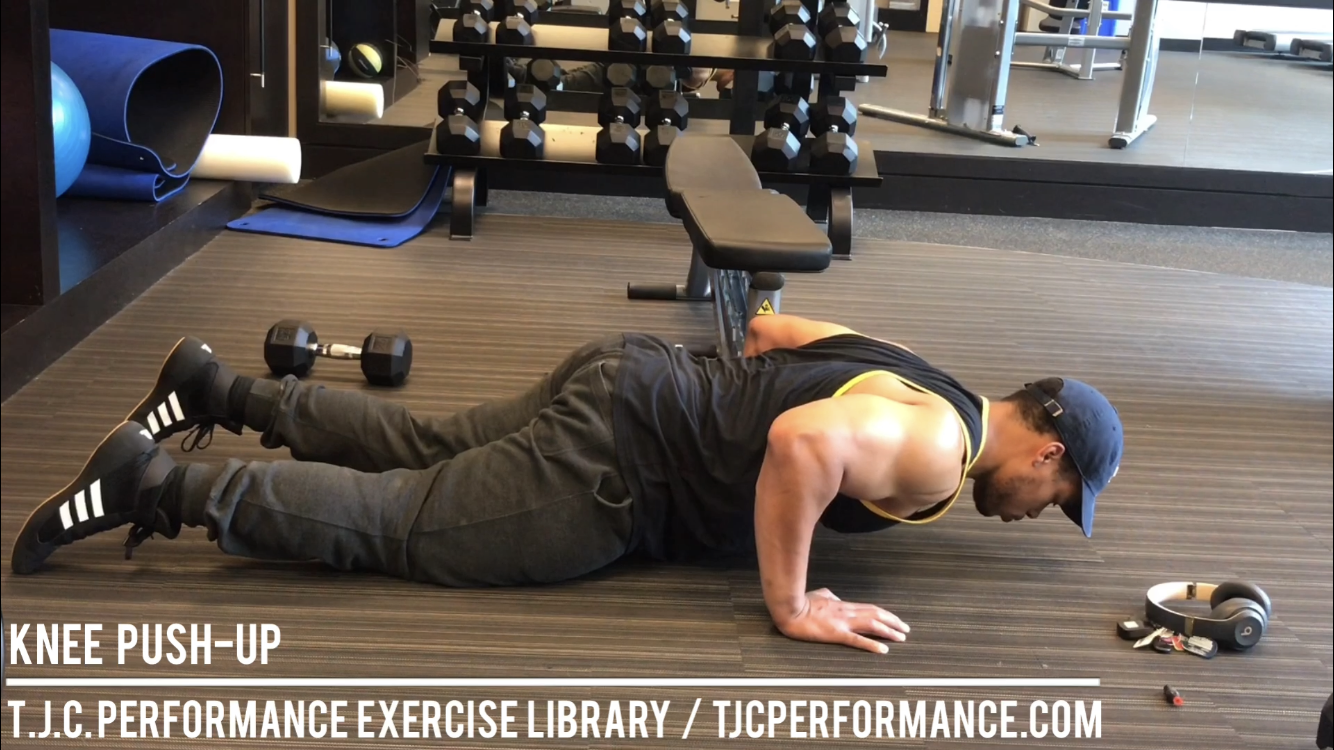
Knee Push-Ups
One of the most common ways to modify a push-up is to perform it on the ground with your knees bent. This is a very practical way to make push-ups easier. However, there are a couple of reasons why this might not always be the best place to start.
First, knee push-ups can still be very challenging. While they are easier than straight-legged push-ups, the demand is still substantial, with the down position being even more taxing. In one study that compared the effect of body mass lifted during push-up variants, a knee push-up supported nearly 15 percent less bodyweight from the traditional push-up (4). For a 150-pound person, that means roughly a 20-pound difference between a knee push-up and a regular push up. While 20 pounds can sound like a lot, it might not be a substantial enough difference to make this exercise much more manageable. This is especially true if traditional push-ups are difficult and you are working on changing your habits.
Second, a lot of people will do this variation with their butt in the air – “The Hippy”. Remember to follow the guidelines of the full push-up and maintain similar alignment. Keep your hips in alignment with your shoulders and the point of contact with the ground – your knees.
While knee push-ups are great for their practicality as a minor way to scale back difficulty on push-ups, there is a better solution that is much more versatile.
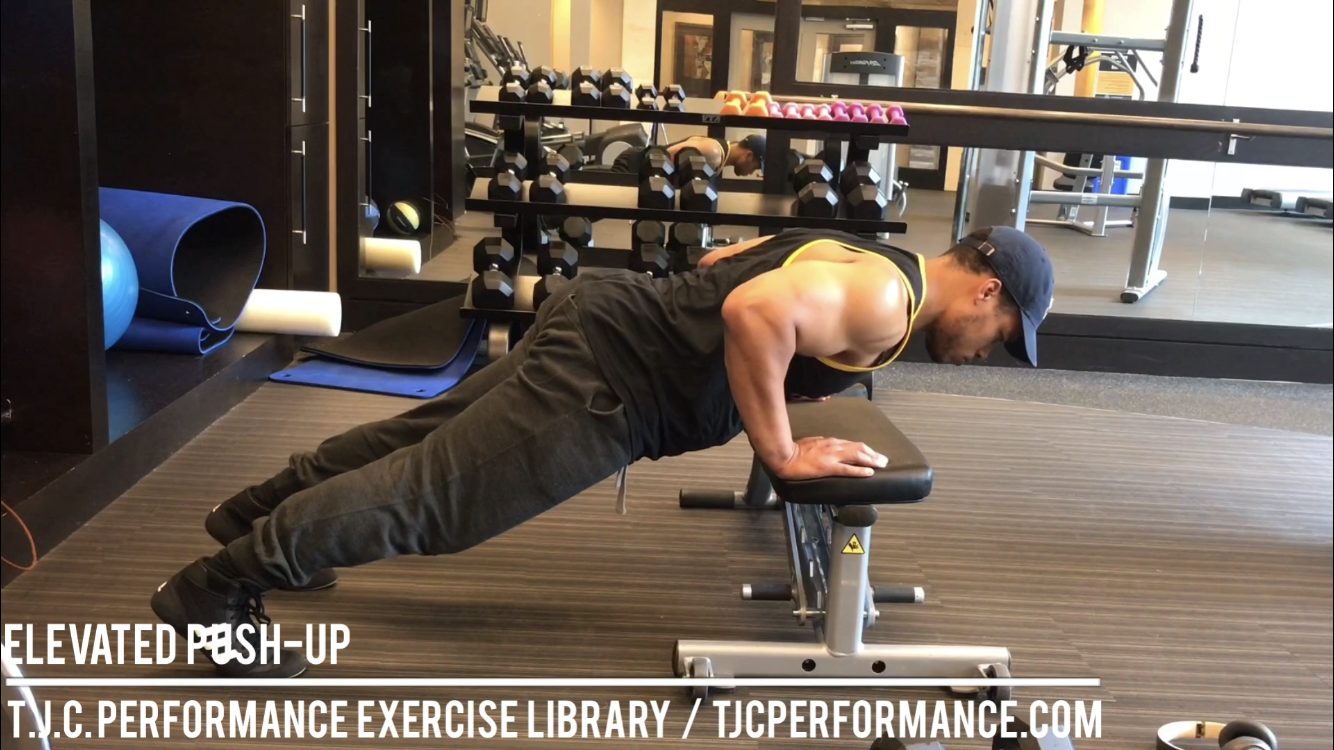
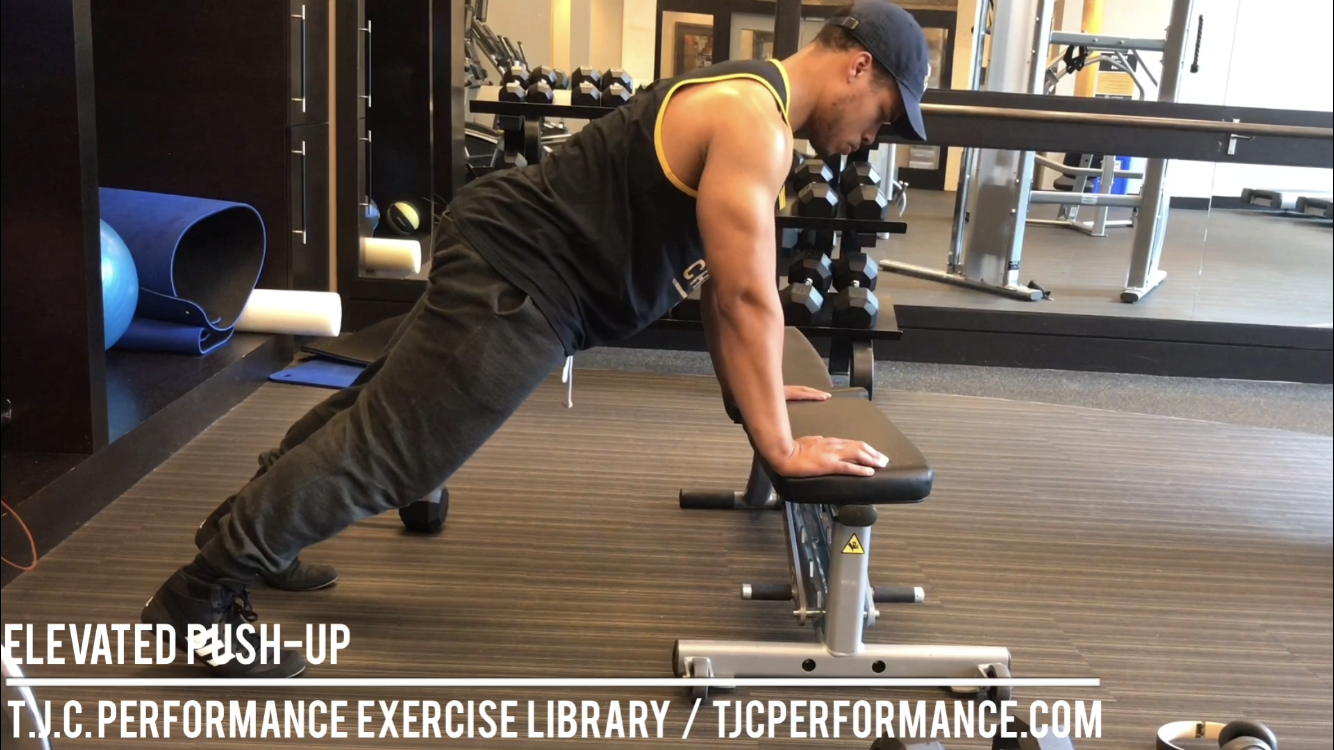
Elevated Push-up
Elevated push-ups are the best variation you can do to modify your push-ups. Elevating your hands so that your body is at angle can make push-ups noticeably easier the more upright your position. By elevating your hands, you can lift a lower percentage of your bodyweight than even the knee push-up.
You can use these to build up your muscle and strength with all the benefits of a traditional push-up. If doing a traditional push-up is a goal of yours, progressively lower you hands over time until you are doing push-ups with your body parallel to the ground.
One of my clients, Marianne, had a goal of improving her upper-body strength and could not complete one traditional OR knee push-up at first. An elevated push-up was one of the key exercises we used to get her to her first push-up on the ground.
Marianne has made huge strides in her muscle tone and strength, especially with her push-ups. Last week, she performed 11 full range-of-motion push-ups with incredible technique. So proud of her!
To perform elevated push-ups, any stable option that allows you to elevate your hands, such as a table or bench (as demonstrated) should suffice. A Smith machine is also a great option because you can systematically adjust the barbell in a stepwise manner to various heights to make the exercise easier or more difficult.
References
1. Yang J, Christophi CA, Farioli A, et al. Association Between Push-up Exercise Capacity and Future Cardiovascular Events Among Active Adult Men. JAMA Netw Open. 2019;2(2):e188341.
2. Cogley RM, Archambault TA, Fibeger JF, Koverman MM, Youdas JW, Hollman JH.
Comparison of muscle activation using various hand positions during the push-up
exercise. J Strength Cond Res. 2005 Aug;19(3):628-33.
3. McMahon GE, Morse CI, Burden A, Winwood K, Onambélé GL. Impact of range of
motion during ecologically valid resistance training protocols on muscle size,
subcutaneous fat, and strength. J Strength Cond Res. 2014 Jan;28(1):24.
4. Suprak DN, Dawes J, Stephenson MD. The effect of position on the percentage of body mass supported during traditional and modified push-up variants. J Strength Cond Res. 2011;25(2):497‐503.
