Part I: What Are Inverted Rows?
The inverted row is a bodyweight horizontal pulling exercise, primarily involving the upper-back, lats, and biceps.
Your core musculature and various stabilizers are also under a significant demand, which can increase based on the exercise device used when performing the exercise (as discussed later in “Part VI: Exercise Variations”).
The inverted row has various names including the following:
- Supine Row
- Fat-Man Pull-Up
- Horizontal Pull-Ups
- Bodyweight Rows
The inverted row and its variations are versatile and can be effectively used both as a beginner or advanced trainee.
Inverted rows can be beneficial for building upper-back strength to attain your first pull-up, sculpting a jacked-er and stronger back, and to enhance performance in sports such as crew, swimming, and wrestling.
Furthermore, inverted rows allows you to develop these muscles with less stress on the lower back, especially when considering other alternatives, such as the popular bent-over barbell row. This differentiation makes it an effective upper-back exercise for individuals with a history of lower-back pain.
Part II: Muscles Involved
What muscles does the inverted row work?
Inverted rows primarily engage and develop the following muscles:
- Latissimus Dorsi
- Rhomboids
- Posterior Deltoid
- Middle Trapezius
- Biceps Brachii
- Forearms

The erector spinae muscles are also involved, but to a lesser degree, especially as compared to bent-over rows.
The development of these areas is usually universal for “pulling” exercises, especially rowing movements. The Inverted Row can afford similar benefits with a few differing factors.
Part III: Exercise Benefits
Rowing exercises (movements involving pulling resistance to you) in general have functional benefits as part of a structured strength training program. Advantages for pulling exercises with a few specific to the inverted rows are as follows:
- Increased Posture – Rowing exercises can help develop postural muscles responsible for helping you sit and stand up straighter. Improved breathing patterns and reduced chances for back and shoulder injuries can result from this enhancement in alignment. (Positional awareness is another key factor in maintaining posture – simply being more mindful of your posture throughout the day).
- Increased Pulling Strength – Pulling strength is essential for picking up objects (i.e. furniture, suitcases, runaway babies) as well as lifting your own bodyweight. Increased pulling strength can also be beneficial for improving performance for sports, including swimming, wrestling, and climbing.
- Increased Grip Strength – Grip strength is important for everything from gripping your pen (“pinch grip”) to carrying your suitcase (support “grip”). Rowing exercises help to develop gripping strength primarily through holding an isometric contraction (i.e. statically holding an object). There also has been research on the correlation between grip strength and overall strength.
- Improved Shoulder Stability – The muscles that attach to your shoulder blades and upper arm are strengthened, providing more stability for your joints. Shoulder stability is not only important for sports performance (especially for baseball players), but also maintaining shoulder health for performing general daily physical activities.
- Improved Core Development – Your core musculature and other stabilizers are under significant demand to maintain your posture throughout the movement. With usage of more unstable devices, including suspension trainers and stability balls, the stability demand increases.
- Easy Adjustment – Adjust the difficulty of the exercise by altering your body angle by lowering the bar or straps. This can even be done in the middle of performing a set with a suspension device. The easy adjustment may allow you to adjust more easily to complete the prescribed repetitions per set.
- Less Spinal Load – The inverted row develops the same muscles (although amount of engagement in certain areas may slightly differ), but has a lower spinal load.
- Develop Bodyweight Strength – Preparing for a Warrior Dash or Tough Mudder? Inverted Rows can help develop your upper-body strength for movements including rope climbs and pulling yourself up over obstacles.
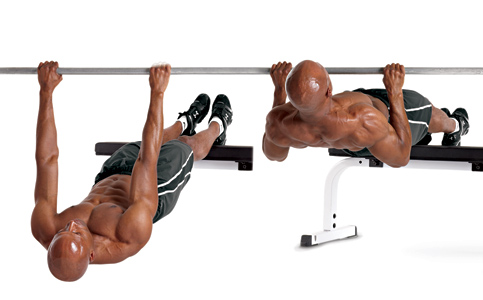
Part IV: Inverted Row Exercise Instruction
Position your hands on the bar about shoulder-width apart with an overhand grip. Start with your feet shoulder-width apart and maintain a straight line between the ears, shoulder, hips, knees, and ankles throughout the movement.
Maintain flexed abs (tighten your abs as if bracing for a punch) and glutes throughout the movement to keep your body rigid.
Begin at a larger angle with the barbell racked at a higher level. Position your lower-chest directly beneath the bar.
The greater your body angle (the more upright your torso is), the easier the exercise. The less of a body angle (the less upright your torso is), the more challenging the exercise:
- Drive back with your elbows and act as if trying to pull the shoulder blades into your back pockets.
- Extend your arms to return to the starting position while maintaining alignment.
- Repeat.
Please note that with each barbell variation, you may choose to use the Hampton Bar Pad or related padding as demonstrated to serve as a marker for your range-of-motion.
Start by completing 6-8 repetitions for 2-3 sets.
Part V. Common Mistakes to Avoid
The following are common mistakes to avoid when performing the inverted row:
- Shoulder Elevation: Prevent shoulders from excessively elevating, or excessively shrugging – instead, maintain shoulders down and back; “pull shoulder blades into your back pockets” while rowing
- Bending Arms: Involve more of the upper-back by focusing on the movement of your shoulder blades as opposed to just bending your arms.
- Excessive Arching: Prevent excessively arching at the lower-back. While you do want to practice optimal posture to reap the most benefit from rowing, try to avoid leading with a protruded chest and overly arched lower-back. Pull with the mid-back and prevent excessively leading with the hips.
- Overextending Hips: Often performed in conjunction with excessive arching, excessively leading with the hips is another compensation. For both compensations, my first recommendation is to adjust by moving backward to position yourself at a greater angle. While this regresses the exercise, making it easier to perform, you can practice proper form and maximize the results of the exercise. Second, try flexing the abdominals and glutes (squeeze your butt) to maintain a normal curve in the back (“neutral spine” for anatomy geeks), especially if you have an anterior pelvic tilt (APT).
Part VI: Inverted Row Variations
The inverted row has a number of variations. Each movement will follow the exercise instruction from Part IV with a few adjustment described.
Think of the instructions as your “skeleton” for the performing the exercise. Practicing the movement pattern here can also supplement you in performing other rowing exercises.
Alterations include changes to grip, equipment, and angle used. Here is a progression continuum for inverted rows:
Greater Angle –> Reduced Angle –> Parallel –> Feet-Elevated –> Feet-Elevated on Stability Ball –> 1-Arm –> No Hands (just kidding)
Suspension Trainer Inverted Rows
Grip the handles or rings about shoulder-width apart with an overhand, underhand, or palms-in grip. Start with your feet shoulder-width apart and maintain a straight line between the ears, shoulder, hips, knees, and ankles throughout the movement.
Tighten the abs and glutes throughout the movement to help keep your body rigid.
The greater your body angle (the more upright your torso is), the easier the exercise. The less of a body angle (the less upright your torso is), the more challenging the exercise:
- Drive back with your elbows and pinch your shoulder blades.
- Extend your arms to return to the starting position while maintaining alignment.
- Repeat.
For inverted rows using a suspension trainer, you can follow the same variations as described in this discussion with similar progressions.
The added instability of the straps will make the movement more challenging and recruit more stabilizers to help perform the exercise.
Furthermore, suspension trainers allows you the flexibility of instantly altering your grip between overhand, underhand, neutral (palms-in), or anything in between.
While a suspension trainer device is mentioned, note that a similar implement (i.e. gymnastics rings) can also be used similarly.
Bent-Knee Inverted Rows
Bent-knee inverted rows are a nice progression for bridging the gap between a larger body angle and a straight-legged parallel body angle.
From a parallel position with your chest directly underneath of the barbell or handles, bend your knees to a 90-degree angle.
Perform the bent-knee variation comfortably before proceeding to the next progression, straight-legged parallel inverted rows.
Straight-Legged Parallel Inverted Rows
Congratulations! You have progressed to an inverted row! You have essentially progressed into performing a bodyweight pull-up at a horizontal angle.
For this variation, simply straighten your legs from the bent-knee position to perform. Please note that with this variation, you can continue to use the Hampton Bar Pad or related padding to serve as a marker for your range-of-motion.
Feet-Elevated
The next progression is elevating your feet onto a stable surface.
Use a bench or another elevated surface that will enable you to finish the movement nearly parallel from the ground to start.
Feet-Elevated on Stability Ball
The final progression in this inverted row series involves elevating your feet onto an unstable implement such as a Swiss ball, adding to overall instability.
For an even greater challenge, progress to using a suspension trainer instead of a barbell.
1-Arm Inverted Rows
The 1-arm inverted row variations can follow a similar progression as the bilateral (i.e. involving two limbs) movements.
For the 1-arm inverted row, you can begin with one arm on the handle and your opposite arm crossing your chest. Resist rotation and keep your body rigid as you would perform the bilateral row. Resisting rotation with the 1-arm row will again place an even greater demand on your core and various stabilizers to maintain your alignment.
Eric Cressey also uses an excellent progression with a Kettlebell racked on one arm as shown here:
On a similar note, when you demonstrate you can perform these movements with proper form, you can add a weighted plate (for parallel variations), a weighted vest, chains, or any other loaded devices to these variations to further increase their difficulty.
The inverted row is versatile pulling exercise with the many of the same benefits as other rowing exercises, with reduced stress on the lower back.
Feel free to leave a comment below if you or a friend have any questions or comments about inverted rows.
-J

Thanks, this was a very useful guide and the different variations are great. I have started inverted rows several weeks ago as an addition to pull-ups as they allow for better movement and muscle control. I naturally prefer the underhand position as opposed to the overhand position, but now try to alternate. What’s your take on the hand position?